Showing posts with label wip. Show all posts

Wednesday, May 30, 2012

MG Heavyarms EW WIP (Weapons)

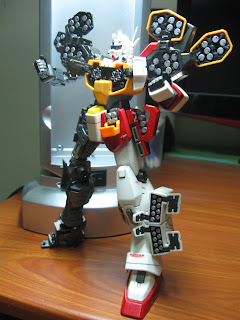
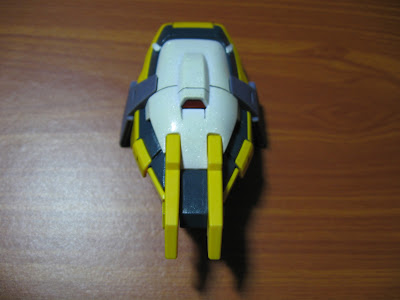
I made different approach on every parts of the beam gatling of MG Heavyarms. Here they are:


I painted these parts with RJ gloss black. Then for the barrel clamp and flash suppressor, I give it another round of gloss black and top coated with RJ dull lacquer. For the barrels meanwhile, I air brushed them with Alclad stainless steel until I got my desired effect. I just need Tamiya X-12 gold for the detailing. Unfortunately when I went to Lil's hobby center in Trinoma, they were already closed permanently :( so I need to go to their branch in Megamall to purchase it.


For the ammo belt, I used Pylox metallic smokey black on it while for the tank, I sprayed with thin coats of Tamiya X-10 gun metal. Decals have also been applied.


For these parts, they were painted with coats of gloss black. Only the difference is that the body of the gatling gun (right side) was top coated with dull lacquer while the part on the left was top coated with Tamiya TS-65 pearl clear. The end or tip of the gun was hand painted with Alclad stainless steel.


The army knife was painted way before I started painting the kit. You can check it here if you wanna see how it was done.

That's almost it. Gonna do some little finishing touches and I'm done with this fella. Pictures to be posted soon! ^__^

Wednesday, May 23, 2012

MG Heavyarms EW WIP (Part 2)

Here's the second part of the Master Grade Heavyarms EW that I'm currently working on. This part focus more on the white, red and orange parts of the kit.

For the orange parts that serves as covers of Heavyarms' missiles I highlighted its panel lines by shading it with 0.1 Uni micro pen until all of the panel lines become black. I then put decals on them before spraying with RJ metallic clear and top coated with RJ dull lacquer. The same procedure goes for the white parts....only that I didn't put metallic clear paint on them but instead only dull lacquer.

white and orange parts waiting to dry after putting flat top coat

On the other hand, I painted the red parts with Tamiya X-7 red. When already dried, I put some of my newly bought Tamiya TS-65 pearl clear on them. I wanted to try how the plastics will look like after painting them with the pearl clear...and I was not disappointed. They produced a shiny gloss look especially when reflected with light. Decals were put last this time.

finished product of pearl red parts (no decals yet)

I decided to build the half left of the kit first and see what it will look like compared to the inner frame only. I also put decals on their respective places as seen in the manual to make it look more fascinating. Here's how it looks now.


Just a little bit more and I'm done with it! ^__^

Saturday, May 19, 2012

MG Heavyarms EW WIP (Part 1)

Now that I have more vacant time compared last month, it only means one thing.....I can already paint my Master Grade Heavyarms EW!!! :) I've already seen a lot of blog posts showing their paint customization job on their MG Heavyarms and I admit that I envy them. I really love their artwork. How I wish that I could do the same to mine especially that this is one of the coolest model kit released.

I have already some plans on my mind on what kind of approach I am going to apply to Heavyarms different parts. I just hope that the execution and outcome will be awesome. Well here goes.....

First I diassembled all the parts and grouped them according to their color scheme. I also sub-divided the grey parts based on the tone that I'm planning to give them.


I painted most of the grey parts with Alclad II magnesium using an airbrush. Just like the previous one, I am so satisfied with the outcome of Alclad paints. However since I'm trying to save paint (since Alclad paints are expensive) I did not paint the whole grey parts. I just painted the parts that will be exposed and let the hidden ones unpainted.

grey parts being painted with Alclad magnesium
missile pods waiting to dry after painting

For some grey parts like the circles on the knee and ankle, I first painted it with Tamiya X-1 gloss black and then with Alclad magnesium. I also gave it a top coat of Tamiya TS-65 pearl clear to give it a shiny look.


I also made some modifications on the cream/white parts like the vents and the ones under Heavyarms shoulders. I painted it with Tamiya X-32 titanium silver to have a contrast. I also did the same to its sliding part on the legs.


For the body, I changed the grey parts around it by using Tamiya XF-53 neutral grey. On the other hand, I already like the color of the orange parts so I just sprayed it with RJ metallic clear and top coated with RJ dull lacquer.


For all the missiles/warheads, I painted it with Tamiya XF-16 flat aluminum and highlighted its panel line with a red gundam marker. I'm so happy with the result...excellent! While for the parts that serves as base of the missiles, I simply painted them with Tamiya gloss black and dull lacquer.


To emphasize Heavyarms' vulcans, I dry brushed them with Tamiya titanium silver after painting with Alclad magnesium. I did the same thing on the guns on his chest.


Here is the over all look of my MG Heavyarms EW as of the moment.


I have to deal with the red and white parts next, as well as the remaining orange parts. I hope I'll finish everything before the month ends. ^__^

Friday, April 27, 2012

Testing Alclad II Paints

It's been a while since my last post. It's because I have been busy doing my project for our training program in our office. Now that I'm done with that...it's back to business now with my passion. lol

I usually use Tamiya acrylic paints in painting my gundams. But I guess they lack some shades of color when it comes to metals. If I'm not mistaken the only color they have is gun metal. I often use Tamiya gun metal color in painting the inner frame of the gundam kit. Actually I prefer Gunze Sangyo acquaeous steel than Tamiya gun metal, but sad to say it's supply here in the Philippines is really limited and really hard to purchase. I would really love to try other shades of metal colors like steel, aluminum, and stainless.

Good thing I have a friend who has other brand of paints..and I'm talking about Alclad II. That's what he usually use in painting his transformers toys, and I find the result really amazing and realistic! Alclad is not available in our country. Good thing he has stocks of it with variety of colors. My friend (Xavier) offered me if I want to buy some of it so that I could try it. At first I was hesitating because it's really expensive compare to Tamiya..almost four times the price. Eventhough it's also about four times its quantity, I have a feeling that it will be consumed fast because its a lacquer and no need to add thinner. However, I still bought two colors from him...magnesium and stainless steel.

Alclad magnesium & stainless steel
I'm planning to use both of them on my MG Heavyarms but I don't know the real outcome of it when painted and I also don't want to waste every single drop of it. So I decided to try it first on Heavyarms's army knife. I wanna test the approach that Xavier taught me in using the said paints. I'm planning to use the magnesium on the army knife's attachment to the arm, and stainless steel on the blade.

unpainted army knife of MG Heavyarms

For the arm attachment, I just simply sprayed the Alclad magnesium on it. No primary paint at all. The result was awesome! I could say that it's the best paint that I've tried so far. No mess..no hassle..and the output was so fine.

monty
painted with Aclad magnesium
On the other hand, I used Tamiya gloss black for the army knife's blade as its primary paint. I sprayed several thin coats on it to have a glossy effect.

painted with Tamiya glossy black
Once totally dried, I sprayed it with thin coats of Alclad stainless steel. I just made some mists on it until I got my desired color. Below is the result.


However it is not advisable to touch often the painted part with Alclad stainless steel because it will cause the paint to fade. little by little and thus the black base coat will be exposed. That is really a big problem to me since I have sweaty hands, so I need to wear gloves to avoid such accident.

I could conclude that Alclad paints are awesome especially when you see for yourself it's outputs. It is quite expensive compare to other paints but in terms of the quality, you'll definitely be satisfied. As for me, I might just used it on selected parts...like the gray parts to make it more metallic and realistic. I would also love to explore its high shine paints like chrome (as well as with stainless steel) but it would be hard for me I guess since I have sweaty hands. So maybe as for now, I'll just go with it's regular paints. Maybe I will try steel next time. By the way, pictures of my finished work for MG Heavyarms' army knife are below.


Saturday, February 25, 2012

MG Sandrock WIP (weapons)

Here is the eight and final part of my master grade Sandrock's WIP. It's all about the weapons. Sandrock's primary weapon is the heat shotel, and that's what I'm going to tackel first.

I've already painted the heat shotel before, together with the inner frame but I'm not contented with it's outcome. I would like to make it look real..to make it's blades realistic but I don't have the right paint with me now. So I remove the heat shotel's previous color by using acetone. When it's back already to its original color, I used Tamiya gloss black for the base coat (instead of using metallic gray before)


I then painted it with Tamiya titanium silver just like the first one. I like the outcome of its color now than before..it became more metallic and luminous, although differences in the pictures below  can't be seen that much.

My first attempt: using metallic gray as base coat
My revised paint: using glos black as base coat
 The color of the shotels' handle on the other hand remained. So I just added the given decals for it. I also give it a flat top coat while the for the blades including the luminous red, I used gloss top coat.


As the name goes..the shotels has the ability to be heated up. I 'm so happy that red blades (showing that it is heated) is also included in this kit as a replacement for the silver blades. Here is a closer look of it.


For the beam machinegun, I didn't make any changes anymore. What I did before together with the inner frame is still the same up to now. The combination of Tamiya flat black as its base coat and topped with Tamiya gun metal looks great for it. Decals were just added to make it look better.


For the shield, below are the parts that needed to be assembled. I painted them separately according to their  respective color. 


For the transparent part, instead of using the provided stickers, I painted it with gloss black topped with Tamiya red. The same thing goes to the blue part..instead of using the white stickers, I just painted it. However the outcome doesn't look that good because I only hand painted it. Below is the assembly of the shield.


This is final product. Still gonna need to put the decals on it...


MG Sandrock's shield..now with decals on it. See the difference from the previous one?


Other angles of the shield...


The "fang-like" of the shield can be pulled down to make it look like a claw.


What I like more on the weapons is that they can be connected to each other. The heat shotels can be locked on a peg under the shield, thus making it a huge weapon.


 The heat shotels can be also open wide while attached to the shield.


But wait..there's more! It is not just the heat shotels that can be attached to the shield..but also the beam machinegun. Just fold the handle and lock it on the shield's ride portion, and it's all done!


Check out the completed Master Grade Sandrock on my upcoming posts. Thanks for viewing! :-)